
Glazed and Foiled Regal Style Cabinet
This month we are focusing on the amazing Artisan Enhancements product line. The AE products provide so many ways to customize your project to get the exact look you want! There are endless creative options and the products are so much fun to work with. We found this awesome tutorial on the Artisan Enhancements blog and had to share it with you. When you read through this tutorial, you'll find each product has a link that will take you directly to the product page on our online store, so click through if you want to find out more information!Also be sure to check out the original post here: http://artisanenhancements.com/glazed-and-foiled-regal-style-cabinet-tutorial/
 Now and then a piece of furniture comes along with great bones but zero personality. We like to think of these pieces as a blank canvas, the perfect subject for an artistic makeover. They need something with a little more dimension and design, something above and beyond a paint makeover. That’s where Artisan Enhancements products really come into play, by taking the paint finish to the next level!Follow along as we share the products and techniques used to transform this bland flea market find into a show stopping statement piece!To begin with, the cabinet doors were removed and the entire piece was painted in Paris Grey. Next, the doors were taped off in a random striped pattern and stripes were painted with varying widths in Old White and Antoinette.
 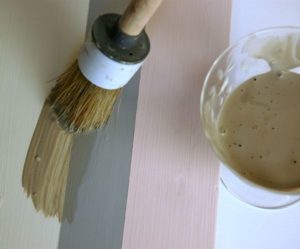 Once the paint had dried completely, a Scumble Glaze was applied to give the paint finish more dimension. Scumble is a tintable glaze and in this case it was mixed 5 parts Scumble to 1 part French Linen. The mixture was applied with a brush and then wiped back with a damp sea sponge. Because Scumble has an open time of 15-20 minutes, you have ample time to work with it and achieve the look you want before it dries.The custom mixed French Linen Scumble Glaze muted the paint finish and gave it an aged effect.
 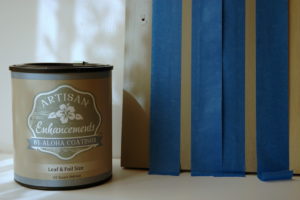 Once the Scumble Glaze was dry, we taped off a few more stripes.Artisan Enhancements Leaf & Foil Size was brushed over these thinner stripes and allowed 20 minutes to “tack up.”
 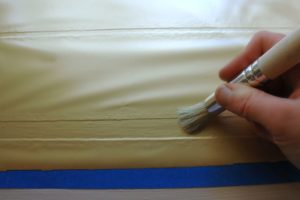 We then applied the Soft Gold Foil, shiny side up over those areas where the Leaf & Foil Size had been applied and used a stencil brush to burnish the foil into the size.
 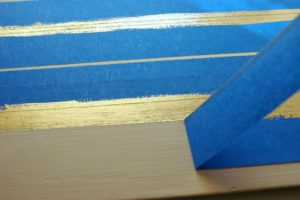 When the tape was lifted, we had nice, crisp metallic gold stripes. You may be wondering why we didn’t apply the metallic stripes when we were taping off and painting the first set of stripes. Had we applied the foil stripes prior to the Scumble Glaze, the French Linen glaze would have dulled and muted the metallic effect, and we wanted it to shine!
 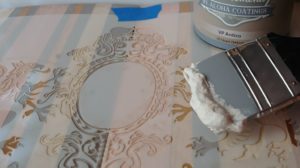 Our Griffins stencil was a perfect fit for these cabinet doors given it’s size and symmetry. With the drawers lined up on a flat surface, the stencil was taped into place. We used our Color Shaper tool to apply a thin, even layer of VP Antico across the top of the stencil.
 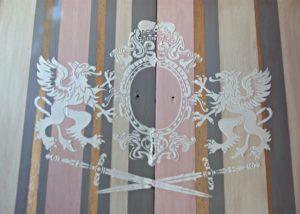 While the VP Antico was still wet, the stencil was carefully removed. The doors were separated and the little bit of VP Antico that had lapped over the spot where the two doors meet, was easily wiped away with a damp cloth creating two, symmetrical designs that would line up to make one when the doors were closed.
 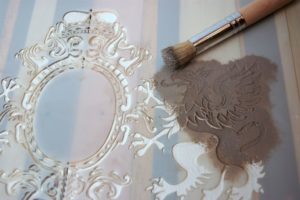 After a few hours, the VP Antico was completely dry and the design was ready to be further enhanced. We laid the stencil back down and went over it with French Linen, using the medium stencil brush.
 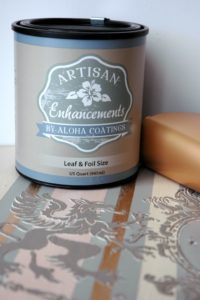 Next, we used a small brush to apply Leaf & Foil Size to a few more places in the design, including the crown, the griffin’s wing tips and the handles of the swords. The Soft Gold Foil was applied shiny side up to these areas after allowing the Size to tack up for 20 minutes. Once again a stencil brushed was used to burnish the foil and then the foil was removed to reveal the gold highlights on the stencil relief design.
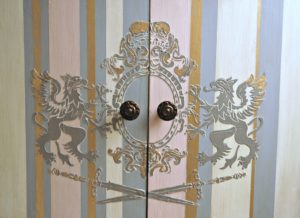 Two coats of Clear Topcoat Sealer were applied, allowing 24 hours of dry time between coats. These were applied using the topcoat brush, designed to get a smooth, even, thin coat of sealer each time.
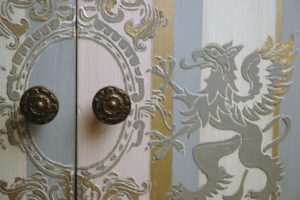 The cabinet doors were then hung back into place and the pulls reinstalled. A once dull and lifeless little cabinet now has a regal, artistic finish!
 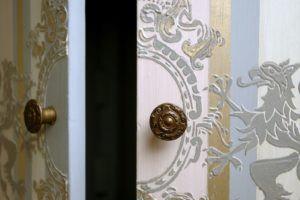 With a little imagination and the right art finishing products and tools, any number of beautiful paint finishes can be achieved! What will you create? If you have any questions at all about these techniques and products, leave us a comment below! We love to help!We hope you’ll share your next Artisan Enhancements inspired project with us! Be sure to hashtag #artisanenhancements in any social media posts featuring your creations!