
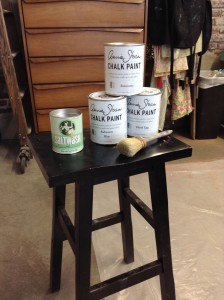
Bar Stool Revival: SALTWASH™
It's time for another Bar Stool Revival! So far you many have seen Vintage Rose Garden and Rust & Stenciled Patina on our blog or at The PAINT BAR. Today I'm going to walk you through the steps I took to create this weathered SALTWASH™ bar stool so you too can create your own layered sun and salt air soaked look! Let's get started...Here's what I used....
- Black Bar Stool
- SALTWASH™ 10oz Tin
- Aubusson Blue Chalk Paint™ 4oz
- Antionette Chalk Paint™ 4oz
- Duck Egg Chalk Paint™ 4oz
- 2" Chip Brush
- Round Annie Sloan Paint Brush, Small
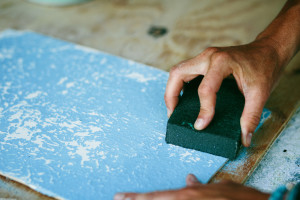
- Sanding Block, Medium to Coarse Grit
- Palm Sander (optional)
- Gloss Topcoat, General Finishes
- Topcoat Brush
- 2 Mixing Containers
- Plastic Spoons or Stir Sticks
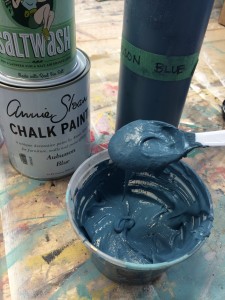
 Step 1: Mixing SALTWASH™ into PaintI started by pouring my 4oz pot of Aubusson Blue Chalk Paint™ into a mixing container. Then gradually added some SALTWASH™ powder into my paint and stirred with a plastic spoon until it got to the consistency of thick cake icing. I also mixed up some Antoinette (a pale pink colour) the same way because I wanted two colours in my basecoat. SALTWASH™ is a really unique product that is fun to work with. There are lots of plasters or products you can add to your paint to thicken it but I like SALTWASH™ because it has no colour which means your paint colour will remain the same! How cool is that? A lot of plasters are white which means when you add them to your paint the colour lightens as it mixes with white. Also, SALTWASH™ be added to any kind of paint so the possibilities are endless! I picked Chalk Paint™ by Annie Sloan because it's the best for furniture, no sanding, no priming required even on the stained and sealed surface of my stool!
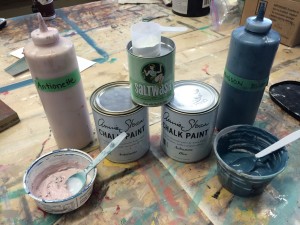
 Step 2: Apply SALTWASH™ Paint MixtureWith my 2" chip brush I applied the Aubusson Blue mix to the entire stool. When I applied the mix I used a pouncing motion to glob the paint on creating tall peaks and ridges. The chip brush is good for this technique because it has uneven bristle ends so helps to add to the texture. I love this process because you can be a little messy and carefree, there's no pressure to get a perfect smooth coat of paint! Once the stool was completely painted I left it to sit until it was halfway dry, about 20 minutes. At this point you take the chip brush and gently smooth out some of the high peaks you've created with a gentle back and forth or side to side motion. I had to be careful not to completely smooth them out but just to soften some of the tall ridges. Then I let this sit until it was completely dry. Because I wanted two colours in my base layer I added a little of my Antionette here and there using the same "goblike" technique as before. When the pink was halfway dry and once again gently brushed it to soften some of the texture. You can see in the photos below both my blue and pink colours applied. Let sit for an hour or more to dry before moving to the next step.
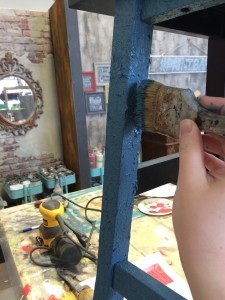
 After my base layer was dry I noticed a few high peaks that were left behind, I just gently sanded them before moving to my top coat of paint. You could choose to leave as much texture as you like.
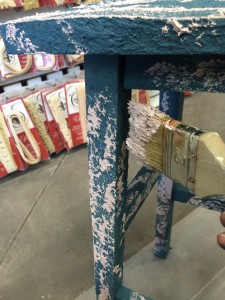
 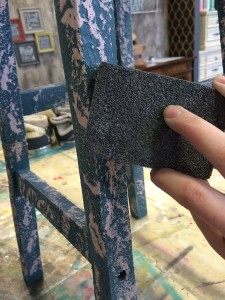 Step 3: Top Coat of PaintNow it was time to paint my top colour, for this I picked Duck Egg Chalk Paint™ and used my small round Annie Sloan paint brush. I liked the beachy look of Duck Egg with my other colours. I absolutely love using my Annie Sloan Round brush because it holds onto a lot of paint and the round end helps when you need to scrub paint into texture just like this project. I applied one coat of the Duck Egg paint to the entire stool. If you've painted something before you know how hard it is to get a "perfect" finish, this project was the exact opposite of perfect smooth finish and so much fun. I love this relaxed, carefree painting style.
 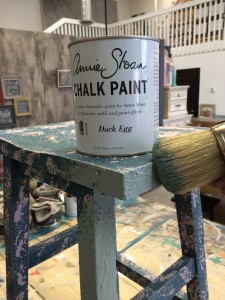 After the stool was completely coated in Duck Egg I had to let it dry. Because the weekend was coming up this stool actually sat for a few days before I got to the next step of distressing. Step 4: DistressTo reveal some of the awesome texture that I created with my SALTWASH™ mixes I needed to distress my piece. To distress means to sand away the paint in some areas to give a worn and weathered look. Without the SALTWASH™ layer beneath the paint would be smooth and you wouldn't see a lot of texture, mostly the edges and detailed areas would sand. Here's an example of a light green distressed paint finish, no SALTWASH™. It's a fantastic effect on it's own but a completely different style than SALTWASH™. With the added texture that SALTWASH™ gives you can really create a beachy, weathered, old chippy looking finish! And here's a close up of a SALTWASH™ finish for comparison. See the difference?
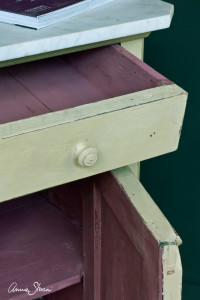
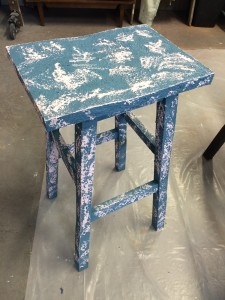
 Now because this had been sitting for a few days my layers had become pretty hard. I started sanding by hand but realized this was a project for my palm sander. So outside I went, here's me in action... (because the sander was noisy I didn't even realize that I was being filmed, notice my startled look and the laughter that follows!) [video width="854" height="480" mp4="http://www.interiorstoinspire.com/wp-content/uploads/2016/03/Distressing-Saltwash-Stool.mp4"][/video] Check out the colours and texture! I love it, what do you think? Step 5: SealBecause this stool gets a lot of use at The PAINT BAR it needed a durable top coat. For this stool I chose General Finishes High Performance top coat in Gloss for a couple of reasons... The gloss finish reminds me of oil based or lead paints that would have been used years ago so that's why I went with the gloss. Did you know that these High Performance top coats are floor rated? That means they are durable enough to be used on a stained or painted floor. If people can walk on it, the it's definitely tough enough for the use it'll get at The PAINT BAR. I brushed on a couple of coats covering the entire surface of the stool.
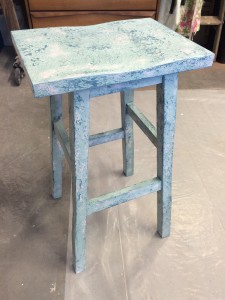
 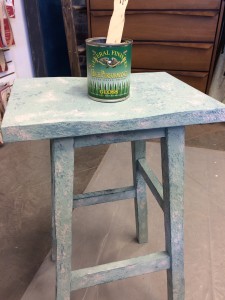 Step 6: AdmireAnd that's it, all done! What do you think? Have you tried SALTWASH™ yet on your own project? If you have any questions about this blog or SALTWASH™ please comment below. Check out our YouTube video where Deanna demonstrates the steps as she finishes a frame with SALTWASH™ & Chalk Paint™ by Annie Sloan!
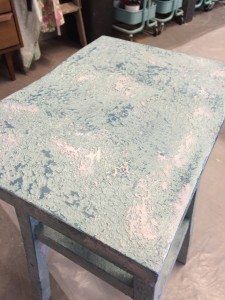
 Thanks for visiting our blog! Hope you'll come by our studio and check out my bar stool soon! Check out the video below to see Deanna share a Saltwash™ demonstration!Kayla https://youtu.be/kxB2HXK6gPA